Sometimes, the programs you install may change your Google Chrome settings without your learning. For your protection, the browser checks to see if your settings have changed every time you start Chrome. If Chrome notices that something is wrong with your settings, it will automatically revert to the original settings. Settings that can be reset automatically:
- Default search engine
- Home page
- Startup pages
- Pinned tabs
- Extensions
If you’re not signed in to Chrome, Chrome will reset your settings. When you’re signed in to Chrome, you’ll still see your standard settings.
There are ways to get more out of Chrome. Below, we’ve put together our favorite almost thirty on Google Chrome settings for Beginners to Advanced Users. We’ll also cover how to open Chrome’s experimental settings, known as flags, and how to reset Chrome by default if you want to start Chrome.
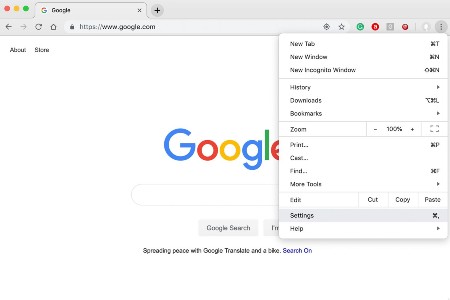
Table of Contents
Google Chrome Settings missing
If the settings menu doesn’t open or doesn’t exist, Chrome may have a problem. To fix it, uninstall Chrome then download Chrome from google.com/chrome again and reinstall it. If you still have difficulties, you may have a program installed that changes your Google Chrome settings.
Read More: How to Uninstall Google Play Services and Reinstall?
Google Chrome notification settings
You can set up Chrome to receive notifications from websites, apps, and extensions to fill reminders. If you receive pop-ups or ads, learn how to block or approve pop-ups.
By default, Chrome informs you whenever a website, application, or extension wants to send you a notification. You can change this setting you desire at any time. You will not be notified if you are browsing in incognito mode.
Read More: What Happens If I Clear Cache File on Google Play Store?
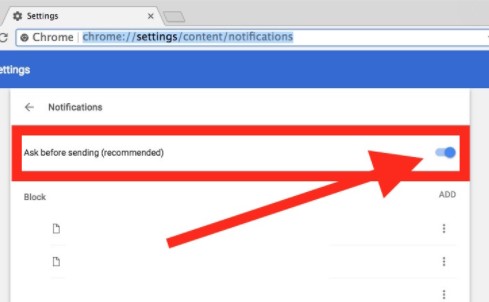
Allow or block notifications from all sites
- On your computer, open Chrome.
- At the top right, click More (three-dot icons)> Settings.
- Click on Site Settings under “Privacy and Security”.
- Click the notification.
- Choose the button to block or allow notifications.
Google Chrome new tab settings
For some people, every time you open Chrome, you’re looking for something different. This is seemingly your best bet if you don’t start your browsing with a specific webpage regularly.
Read More: What Happens When You Clear Google Play Services Data?
- Open Chrome.
- Click on the overflow icon, which looks like three vertical dots in the upper right.
- Click to open the settings menu.
- Scroll down and click on Advanced Settings.
- Select Open new tab under On Setup.
Google Chrome proxy settings
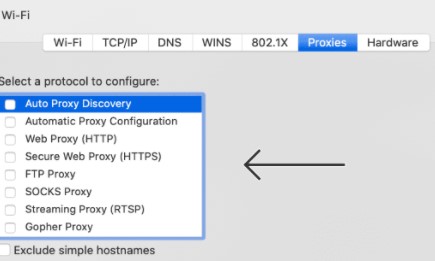
- First, click the Chrome menu on the browser toolbar.
- Second, select Settings.
- Third, click Show advanced settings.
- Fourth, in the “Network” section, click Change proxy settings.
- Fifth, click on the Connections tab and then click LAN Settings.
- Sixth, under Proxy server, click to select the Use a proxy server for your LAN check box.
Google Chrome language settings
Adjust the language of your Chrome browser (Windows and Chromebook only)
You can set Chrome to display all settings and menus in the language you need. This option is only accessible on Windows and Chromebook computers.
Read More: How to find administrator password in Windows 10 using command prompt
Mac or Linux? Chrome for your computer will automatically appear in the default system language.
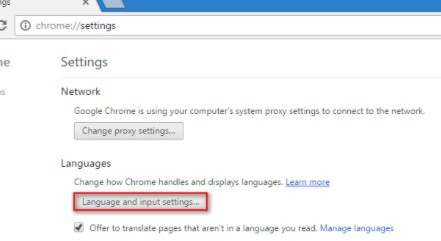
- On your computer, open Chrome.
- At the top right, click More Settings.
- At the bottom, click Advanced.
- Under “Languages,” click Language.
- Next to the language, you require to use, click More.
If the language is not listed, add it by clicking Add Language.
- Click Display Google Chrome in the language or Display Chrome OS in the language.
This option is only accessible on Windows and Chromebook computers.
- Restart Chrome to apply the changes.
Google Chrome Autofill Settings
The Chrome Autofill feature is enabled by default but is disabled in some versions. So, to configure Chrome’s Autofill, you need to enable the function from settings. Check out the best way to enable Chrome Autofill.
- Open the Chrome browser.
- Now click on the menu and select ‘Settings’.
- There you will find an ‘Autofill’ section. It will have three options – Password, payment method, address, and more.
- Then click on the Password and enable the ‘Offer to save password’ option.
- Now under ‘Payment Methods’ enable ‘Save and Fill Payment Methods,’ Click ‘Add’ if you want to add a new payment method.
- You need to enable ‘Save and fill in addresses‘ in addresses and more. To add your addresses, click the “Add” button.
That’s it! You did it. Restart the web browser for the settings to take effect.
Google Chrome location settings
Before sharing your location, review the website’s privacy policy.
If you apply Google as your default search engine on your phone, your location is used by default for your Google search.
Read More: Is there a 32-bit version of Windows 10
Computers Android iPhone and iPad
Change your default location settings.
- On your computer, open Chrome.
- At the top right, click More Settings.
- Under “Privacy and security,” click Site settings.
- Click Location.
- Turn to Ask before accessing on or off.
To change the settings for a particular website, learn how to add and edit exceptions.
Google Chrome registry settings
Includes a sample registry (.reg) file to customize to define settings in the Enterprise Bundle’s Chrome browser.
Read More: How to do Windows 10 safe mode password reset without disk
Configure settings on a Windows computer
- Download the Chrome Browser bundle zip file.
- Then open the bundle and go to the configuration examples.
- Copy the Chrome.reg file.
- Open the .reg file in the editor of your choice. You can edit files with any text editor.
- Execute any changes and save the file (examples below).
Apply your preferred method to target settings for machines.
When a user runs the chrome.reg file, the registry keys are saved
HKEY_LOCAL_MACHINE Software policy Google Chrome.
For directions on how to add, modify, and delete registry keys, see your Microsoft documentation.
Important: Registry modification can damage the computer. Check all changes before you place them on the user.
Google Chrome compatibility view settings
The common practice for this scenario is to right-click on Chrome’s icon>Properties>Compatibility tab. If you have different configurations for the Chrome browser running Windows 10, you can use a device management solution that lets you do more than just “compatibility settings“.
Read More: How to uninstall apps that won’t uninstall in Windows 7, 8, 10
Google Chrome encoding settings
If you find the .txt to be open in the Google Products section and the text is garbled, you can renew your browser’s encoding settings to render this section correctly.
To adjust the encoding settings of your Chrome browser, follow the browser-specific steps below.
You can’t fix Chrome’s encoding settings, but you can try using an extension to fix issues with the globular text.
Read More: How To Empty Recycle Bin Windows 7
- Visit the Chrome Web Store.
- At the top left, click Extensions.
- Enter “Garbled text” in the search bar.
- Choose an extension.
Google Chrome ad blocker settings
Drop-down menu (top right corner of the browser three vertical dots), choose “Settings“. Next, continue to the tab “Extensions” on the left-hand side of the screen. It will open the extension window of Google Chrome, where you will see Adblock Plus. Under the description, you can see the “Options” hyperlink.
Google Chrome audio settings
First Begin a new Chrome window and then click on your Menu(top corner of the browser)>Settings. Then Click on Advanced Settings > Content Settings (under Privacy section). Then Scroll down to Microphone and set your desired device.
Read More: How To Put Recycle Bin On Desktop Windows 7
Google Chrome antivirus settings
Technique 1: Add Exceptions to Windows Firewall
- Type firewall in the search box and start the firewall and network protection program.
- Then click Allow an application through the Firewall.
- All applications installed on your computer will be listed. Click to change settings and check in the Google Chrome box. Then click, OK.
Windows Firewall may prevent your program from accessing the Internet. This post shows you how Firewall will allow a program through Windows 10.
Technique 2: Add Exclusion to Windows Defender
It would help if you then excluded Windows Defender. To do this, follow the steps listed below.
- Open the Settings app, then select Update and Security.
- Navigate to the Windows Defender section, then open the Windows Defender Protection Center.
- Click the Virus and Threat Protection section and then select Virus and Threat Protection settings.
- Scroll down to search for exceptions, then click the Add or remove exclusions option.
- Then Click the Add an exclusion button to add Windows 10 Antivirus Exclusion. Then, you need to select the items in the Google Chrome folder and follow the on-screen instructions to configure Windows Defender exclusions.
Technique 3: Add Exception to the Antivirus Web Shield
To enable Chrome to access the network in your firewall or antivirus settings, you need to perform the following steps. Here I take Avast as an example.
Read More: Screen Mirroring Windows 10 To Samsung Smart TV Not Working
- First, open Avast on your computer and go to the Avast dashboard.
- Then click on the menu and click on the Settings tab. Click the Exceptions tab below the General tab.
- Then Under this tab, click ADD EXCEPTION, and a new window will pop up. Then you can type the URL you want to add.
- Click ADD EXCEPTION to save the URL.
You should then go back to your browser and try to access the URL to check if the problem is fixed. Here’s all the information on how to allow Chrome to access the network on your Firewall.
Google Chrome content settings
Google Chrome – Adjust website content settings
- On your computer, open Chrome.
- At the top right, click More. Settings.
- At the bottom, click Show advanced settings.
- Under “Privacy,” click Content settings.
- You can change the following content settings.
Google Chrome cookie settings
If you don’t already have one to use in your Google Account browser (such as Chrome or Safari), turn on cookies on
- On your computer, open Chrome.
- Click More at the top right>Settings.
- Click on Site Settings under “Privacy and Security”.
- Click Cookies.
From here, you can: Turn on cookies: “Blocked,” then turn on the switch. Turn off cookies: Allow sites to store and read cookie data.
Important: If you receive a message that cookies are turned off, you need to turn them on to use your account.
Google Chrome color settings
How to change the color of Google Chrome
- First, click the Google Chrome “Wrench” button and select “Options”.
- Then click the “Personal Stuff” option.
- After that click the “Get themes” link under the “Themes” section to go to the Google Chrome Themes Gallery. Click the “Apply Theme” button below the theme with the color of your choice.
Google Chrome download settings
To save a file or image to your computer or device, download it. The file will be saved to your default download location.
- First- On your computer, open Chrome.
- Second- At the top right, click More. Settings.
- Third- At the bottom, click Advanced.
- Fourth- Adjust your download settings under the “Downloads” section: To change the default download location, click Change and choose where you want to save your files.
Google Chrome display settings
You can resize text, images, and videos for one webpage or all web pages. Set the page or font size for all web pages.
- First on your computer, open Chrome.
- Then At the top right, click More. Settings.
- After That under “Appearance,” make the changes you want: Change everything: Next to “Page zoom,” click the Down arrow.
Then select the zoom option you want. Resize font: Click the down arrow next to “Font size.”
Google Chrome encoding settings
You can’t change Chrome’s encoding settings, but you can attempt using an extension to adjust issues with garbled text.
- Visit the Chrome Web Store.
- At the top left, click Extensions.
- Enter “Garbled text” in the search bar.
- Choose an extension.
Google Chrome export settings
How to Export Your Profile Data is described here-
First, you press “Windows+R,” then type or paste “%LOCALAPPDATA%\Google\Chrome\User Data\” (without quotes) into the Run window and press “Enter.” Then use the right mouse button. And drag the “Default” folder onto your desktop. a USB drive or wherever else you desire to save the profile and pick “Copy Here.”
Google Chrome flash settings
The Adobe Flash plugin lets you listen and watch Flash audio and video content in Chrome on your computer. Allow sites to run Flash.
- First- on your computer, open Chrome.
- Second- At the top right, click More. Settings.
- Third- Under “Privacy and security,” click Site settings.
- Fourth- Under “Content,” click Flash.
- Fifth- At the top, turn off Block sites from running Flash (recommended).
Note: Adobe will end Flash support by the end of 2020. Check out the Chrome blog to learn more about how Chrome will work with Flash by 2020. Only allow Flash run on websites that you believe. Some websites might accept Adobe Flash Player to harm your computer.
Google Chrome firewall settings
If you’re having trouble with this, here are some troubleshooting tips to help you fix network access to Chrome for your firewall or antivirus settings error in Windows. Add Chrome to Windows Firewall
- First, Press Windows key + R to open the run.
- Type control and click OK. This will open the control panel.
- Click System and Security.
- Click on Windows Defender Firewall.
- On the left-side pane, Click on Allow an app or feature through Windows Defender Firewall option.
- Click the Change Settings button. Click Yes, if prompted by UAC.
- Then click on Allow another app button at the end.
- After that, In the Add, an app window clicks on Browse.
- And Navigate to the following locations: C: Program Files (x86) Google Chrome Application
- Select Chrome.exe and click Open.
- Click Add.
- Then make sure you check both private and public boxes.
- Click OK to save changes.
Start Google Chrome and try using the browser. If the error occurred due to a blockage of the Windows Firewall connection, you should now connect without any errors.
Google Chrome flags settings
For accessing the flags menu, type chrome: // flags in the address bar and press Enter. Here, you’ll notice a long list of options, each with a drop-down menu that can be set to default, enabled, or disabled. There are plenty of them, so finding what you want is to press Ctrl + F and search it.
Google Chrome homepage settings
Select your homepage
- First, on your computer, open Chrome.
- Second, At the top right, click More.
- Third, Select Settings.
- Fourth, Under “Appearance,” check the box Show Home button.
- Fifth, Below the “Show Home button,” click Change to choose your homepage.
Google Chrome language settings
If you come across a page written in a language you don’t comprehend; you can use Chrome to translate it.
- First, On your computer, open Chrome.
- Second, Go to a webpage written in another language.
- Third, At the top, click Translate.
- Fourth, Chrome will translate the webpage this one time.
Is it not running? Try refreshing the webpage. If it’s still not functioning, right-click anywhere on the page. Then, click Translate to [Language].
Google Chrome pop up blocker settings
By default, Chrome will inform you when a pop-up is blocked and allow you to see it. To turn off pop-up blocker, match these instructions:
- First, click the Customize and control Google Chrome menu.
- Second, Select Settings.
- Third, Click Advanced at the bottom.
- Fourth, Under Privacy and security, click the Site Settings button.
- Fifth, Select Pop-ups and redirects.
- Sixth, To disable the pop-up blocker uncheck the Blocked (recommended) box.
- Seventh, To enable pop-ups on specific sites, check Blocked (recommended) and click Add next to Allow and enter the URL(s).
Google Chrome print settings
You can print from Chrome applying your computer or mobile device. With Google Cloud Print, you and anyone you like can make printers available. If your printer says, it’s not cloud-ready, follow the steps below.
- First- Turn on your printer.
- Second- On your Windows or Mac computer, open Chrome.
- Third- At the top right, click More Settings.
- Fourth- At the bottom, click Advanced.
- Fifth- Under “Printing,” click Google Cloud Print.
- Sixth- Click Manage Cloud Print Devices.
- Seventh- If prompted, sign in with your Google Account.
- Eighth- Choose the printers you desire to connect, and then click Add Printer(s).
The printer is connected with your Google Account and associated with Google Cloud Print. At last, you can print to this printer from any equipment you have signed in to with your Google Account.
Google Chrome parental settings
To set parental controls in Chrome, you can turn on SafeSearch, which filters out noticeable results from Google Search. You can set up Google Family Links for more parental controls to monitor and limit screen time. You can block websites in Chrome using browser extensions. Manage your child’s activity on Chrome
- Open the Family Link app.
- Select your child.
- On the “Settings” card, tap Manage settings. Filters on Google Chrome.
- Choose the setting that’s right for your family:
- Tap Manage sites to allow or block specific sites manually.
How to reset Google Chrome settings
When you wish, you can reset your browser settings in Chrome at any time. You might require to do this if apps or extensions you installed changed your settings without your information. Follow the instruction on how to reset Google Chrome settings:
- First, On your computer, open Chrome.
- Second, At the top right, click More Settings.
- Third, At the bottom, click Advanced.
-
- For Chromebook, Linux, and Mac: Under “Reset Settings,” click Restore settings to their original defaults Reset Settings.
- For Windows: click Reset Settings Reset Settings, Under “Reset and cleanup,”
These steps will not provide a complete reset. For example, some settings, similar fonts or accessibility, will not be deleted. To form a new user profile, add a new user to Chrome.
How to reset Google Chrome settings in android
- Open your device’s “Settings” menu, then tap on “Apps”…
- Find and tap on the Chrome app.
- Tap “Storage”. …
- Tap “Manage Space”. …
- Tap “Clear all data.” …
- Confirm by tapping, “Ok.”
Final words
So, this article is about how to enable and configure Google Chrome settings for Beginners to ADdvance. I hope this article helped you! Several terms can be severe to understand for you, don’t worry, try to read repeatedly, and then it will be more comfortable. You will enjoy it. It also will be useful for the Google Chrome settings that you did not know earlier. Please share it with your friends. When you have any trouble with this, let us understand in the comment box.